Monday, September 10, 2012

How To Replace The Indicator Bulb of a Mercedes Benz MB100D Van

One of the downsides of living in a big city is petty crime. The other day when I got up to go to work I found that someone had stolen one of the indicators of my Mercedes Benz MB100D van! So today I'm going to explain step-by-step how we replace the entire indicator assembly. At the end of the post I'll also explain how to change just a blown bulb (more common).

If you are replacing a damaged indicator assembly the first step will be to remove it. Since someone has already done this for us I will just say that removal is simply a matter of reversing these steps!

White mercedes benz van with missing indicator


Once you've removed the old/broken assembly, the next thing to do is remove the indicator bulb holder from the new assembly and connect it to the wiring loom. Copy the connections from the old indicator bulb holder (Since I didn't have anything to copy I connected the brown wires to the tip of the bulb - in fact I don't think it matters which way round you connect them).

This is easiest done before the indicator housing is replaced. The wires are easier to get at from the front of the van through the gap left by the missing indicator assembly.

Simply push the 2 spade connectors into place then gently hang the bulb holder and bulb into the wheel arch as shown. Now is a good time to check that everything is working correctly. Turn the ignition on and check that the direction indicators and the hazard lights now function correctly . There's no need to start the engine, if everything is OK the indicators should now work.

If they don't check the following:
  1. That the spade connectors are connected and that they aren't short circuited.
  2. That the fuse hasn't blown ( The fuses are on a board under the dash by the steering column. The indicator fuse is the fourth one down on the right hand side. If it has blown change it for a 7.5A replacement - check for short circuited connectors first)
  3. That the relay isn't working. The Mercedes Benz MB100D has 2 relays related to the indicators, one for the hazard lights and one for direction indicators. They are on the fuse board under the dash and are the 2 larger relays.


Mercedes benze indicator bulb holder fitted to wiring loom
Connect the bulb holder and check the indicators work correctly before replacing the assembly
The indicator bulb hangs inside the wheel arch
Carefully let the indicator bulb hang down inside the wheel arch
Once you've checked that everything works and the bulb is hanging inside the wheel arch you can now fit the indicator assembly in place.

This simply clicks into place and is held there by the 2 integral clamps. First you locate the tabs at the side of the headlight then push the assembly home until it if firmly seated. You will hear the 2 plastic clamps at the back of the headlight click into place but keep pushing until the 2 outer grooves locate firmly on the van bodywork. You need to push fairly hard to get it to locate totally flush with the wings. Don't be afraid, I ended up giving brisk taps on the indicator lens with the heel of my hand to get it to sit fully flush.
photo showing where the indicator housing connects to the van
The 6 location points
Once the Indicator assembly is fitted you can twist the bulb holder into place. This is done from below,reaching up from the wheel arch. The good thing about older vehicles is that there's plenty of space to do this!


indicator housing seen from below through the wheel arch
Twist the bulb holder into place from below
Here's a few more detailed photos that might be useful.


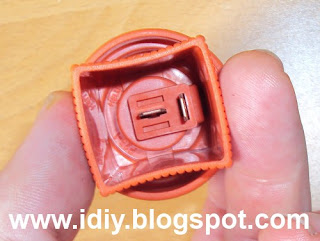
orange indicator bulb holder
Spade connectors of replacement bulb holder


Mercedes indicator assembly showing locating points
Replacement indicator housing showing 5 of the 6 locating points
IMPORTANT
If you're simply replacing a blown bulb then you don't need to remove the whole assembly. Simply reach up from below the wheel arch and twist the bulb holder out (quarter turn anti clockwise). Replace the bulb then twist the holder back in place.

If after doing this the indicators don't work check the fuses (panel under the dash next to the steering column) and relays as described above.

As always - If you have any questions or comments please leave a comment below and I'll try to help out if I can.


Monday, July 9, 2012

How to Adjust the Handlebar Folding Mechanism on a CONOR INDIE (Dahon clone) Folding Bike

I commute to work each day by bicycle and a few weeks ago bought myself a shiny new CONOR INDIE folding bike.

I chose this bike because it seemed to offer the best quality within my budget. One thing that really attracted me to the bike was the fact that the folding mechanisms are licenced copies of the Dahon folding mechanism.

I looked at a few different models of folding bike and the Dahon folding mechanism (also known as the "ViseGrip" hinge) seemed to be way better engineered than the other options. It is both very quick and easy to use and very firm once closed.

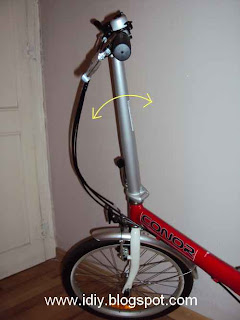
I've been using the bike daily for about 4 weeks now and have noticed that there is slight play in the steering column. This means that the handle post hinge (as dahon refers to the folding mechanism) needs tightening slightly.


conor indie folding bike front end
Undesireable "play" in the handlebar post

To do this you need to first fold the handlebars down against the wheel.


fold down the handlebar post of the bike
Fold the handlebar post down

Next the handle post hinged is adjusted using a suitable spanner to tighten the latch bolt as shown in the photo. I tightened it by just under a quarter turn (see arrows indicating direction) this was enough to stop the handle post from wobbling without making the mechanism too tight to close.


Turn the latch bolt to the right to tighten
Turn the latch bolt to the right to tighten

If the mechanism is difficult to close you need to loosen it by turning the latch bolt in the opposite direction (see below)


Turn the latch bolt to the left to loosen

The main frame hinge clamping mechanism (arguably the most important component on a folding bike) which Dahon call the "ViseGrip Hinge" didn't need to be adjusted. However, I thought I'd include a couple of photos to show how to adjust the main frame hinge clamp.

The working principle is exactly the same as for the handlebar hinge. Simply turn the latch bolt in small increments (Dahon recomend one sixth of a turn at a time or 60 degrees)


Main Frame Hinge ( Dahon ViseGrip)

This direction loosens the clamping mechanism:


Turn the latch bolt upwards to loosen

And this direction to tighten it:


Turn the latch bolt downwards to tighten

The ViseGrip Hinge is correctly adjusted when it closes firmly but without needing excessive force.

According to Dahon specifications:

Steel framed bikes 29 - 59 N
Aluminium framed bikes (like my CONOR INDIE) 49 - 59N

It took about a minute to adjust the handlebar post folding hinge.

As always, if you have any questions please leave a comment below and I'll try and answer as best I can.


Sunday, June 10, 2012

How to Repair an Ariston Oven Door

The door of my friend's 15 year old Ariston electric oven has 2 problems:

  1. The oven door doesn't stay shut (old hinges with weakened springs).
  2. The inner glass has come partially unstuck, this means that the door lets heat out and that it is impossible to clean the door properly since the glass will likely come away completely.
I decided to break this post down into 3 key stages:


NOTE: Since the oven is about 15 years old I wasn't surprised when my local Ariston dealer told me that the hinges are no longer available. A few minutes searching online later I sourced replacements online. When the hinges arrived they turned out to be slightly different; They have only one spring instead of 2 and are fixed by 3.5mm screws instead of 4mm. Saying that they fit perfectly and work fine (as you can see in the photo above of the repaired oven).

How to Remove an Oven Door

This post explains how to remove an oven door. We removed the door in order to replace worn out hinges and the window glass. You might also want to remove the door in order to clean the oven really thoroughly.

Oven Door Removal Step 1.

Open the door fully to reveal the small metal flap on each door hinge.

Oven door hinge open

Oven Door Removal Sep 2.

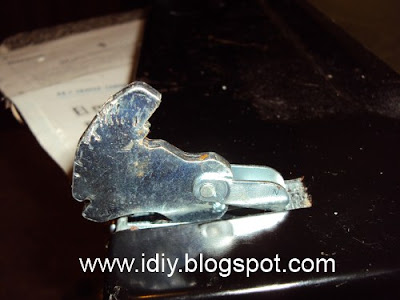
Lift the metal flap using a screwdriver and rotate it to the fully open position.

Oven Door Removal Step 3.

Partially close the oven door until the Small meta flap causes the hinge to remain blocked open.

door hinge
Note: The original photo taken while removing the door wasn't very good so we used a door hinge which had been removed from the door to illustrate more clearly how the hinge blocks open

Oven Door Removal Step 4.

Lift the door clear of the oven (Upwards and Outwards at 45 degrees)

oven door hinge

Oven Door Removal Step 5

Replacing the door is the reversal of the above process. Once the door has been correctly seated on its hinges make sure that the flaps close fully.

NOTE: The illustrations show the hinges used on Ariston ovens and some other makes. There are other types of hinge but the removal method relies on a similar principle: Open the door fully then block the hinge open in order to lift the door clear of the oven.

As always, if you have any comments or questions please comment below.

How To Replace Oven Door Hinges

A pretty common problem with older ovens is that the door no longer stays closed due to faulty hinges. This is the case with my friend's 15 year old Ariston oven. Its pretty easy job to replace the oven door hinges. Even tho the cooker is pretty old replacement hinges are available online. This is an Ariston Oven but the sequence is similar for other makes.

Oven Door Hinge Replacement Step 1

Remove the door from the oven  as described in this post: How to remove an oven door.

Oven Door Hinge Replacement Step 2

Place the door on a flat surface and remove the 4 screws at the bottom of the door.


Ariston oven door


Oven Door Hinge Replacement Step 3

Once the 4 screws have been removed we lift away the chromed metal plate from the bottom of the door and carefully slide the outer door glass (door fascia) out of the handle which retains it along the upper edge.


ariston


Oven Door Hinge Replacement Step 4

The outer glass is lifted away to reveal the hinges are now only held in place by a metal tab at the top and can be lifted out .

oven door hinges


Oven Door Hinge Replacement Step 5

The replacement door hinges need to be partially opened using a large screwdriver or pliers. They can then be slotted into place in the oven door.

fix oven door hinge


Oven Door Hinge Replacement Step 6

Once the new hinges are in place it's just a matter of reversing the sequence to reassemble the door and fit it back to the oven. Take care when opening the door hinges and blocking them open using the small metal tabs they can easily spring shut - This is best done by 2 people, one holds the hinge in the open position with pliers and the other uses a flat screwdriver to open the flap and lock the hinge open ready to slot into the holes each side of the oven.

oven door hinge


How To Replace The Oven Door Glass

The inner door glass of this Ariston oven was glued in place at the factory. Unfortunately it had become partially unstuck and needed gluing back in place. To do this you nee a silicon glue which can withstand the 300ºC temperature of the oven and remain flexible to absorb the expansion and contraction of the metal door frame. I couldn't find this in my local hardware store so once again I had to buy online. Luckily there are various options available. I bought 3 tubes of glue from www.ovendoorglue.co.uk which came with a handy scraper and plastic gloves to protect your skin from the silicon glue.

PLEASE READ THE ENTIRE ARTICLE BEFORE STARTING THE REPAIR!

How to Replace Oven Door Glass Step 1

First we remove the door from the oven as described in this post: How to remove an oven door


How to Replace Oven Door Glass Step 2

Next we disassemble the oven door as described in this post: How to replace oven door hinges


How to Replace Oven Door Glass Step 3

We now remove the partially unstuck inner door glass from the door frame and thoroughly clean both parts with KH7 de-greaser. We scrape off the left over glue and any burnt on grease using a razor blade scraper before cleaning both parts again with the de-greaser.

oven door glass


How to Replace Oven Door Glass Step 4

Once both parts are thoroughly clean and grease-free we clean the glass and the metal where we are going to glue it to with alcohol. Lastly we wipe the surfaces which are going to be glued with the wipes provided with the glue. It is essential that both parts are absolutely clean and grease free otherwise the glue wont stick properly.

clean ariston door


How to Replace Oven Door Glass Step 5

Te next step is to prepare ourselves to glue the glass back in place. We put newspaper on the kitchen table to protect it and the oven door on top. We then put the glass in place and use small strips of masking tape to mark where the glass goes. The strips of tape are both a guide for when we put the silicon glue on the frame and subsequently allow us to locate the glass correctly without having to move it and smear the glue around. We also do a dry run with the cam clamps to check that we are 100% ready before adding glue - this avoids nasty surprises when the glue is applied.

How to Replace Oven Door Glass Step 6

Apply a continuous bead of glue around the perimeter of the metal frame using the strips of masking tape as a guide.

NOTE: There is a 2mm lip around the edge of the metal frame. This means that it is essential that the bead of glue is deep enough to ensure that it comes into contact with the glass all the way round. We used 3 tubes of silicon glue.

glue door glass


How to Replace Oven Door Glass Step 6

Now we position the glass in the door and clamp it gently in place with 2 cam clamps (using plywood to spread the load evenly across the glass). It is important that you don't clamp it too tightly, the idea is to hold the glass in place as the glue dries, not to create "glue squeeze-out" or heaven forbid damage the glass!


How to Replace Oven Door Glass Step 7

We leave the glue to dry for 48 hours before un-clamping. Once the clamps are off we remove the strips of tape and check that the glass is glued in place correctly.

How to Replace Oven Door Glass Step 8

Finally we reassemble the door as described in the post: How to replace oven door hinges

And reattach it to the oven as described in:  How to remove an oven door


As always, if you have any comments or questions please leave a comment below.


Sunday, April 22, 2012

How to Repair a Broken Rolling Window Shutter.

If you live in a house or flat with rolling shutters then you’re probably familiar with the problem of a fallen shutter that you can’t raise.

There are 2 common causes:

1. The webbing strap which raises the blind has worn and broken.
2. The blind has separated from the drum which it rolls around.

Today we are dealing with the second of these 2 causes.

This type of failure is common in old shutters.

The plastic becomes brittle with age and prone to breaking.


Here we can see that the top lamina has broken at the point of attachment to the drum.The shutter then fell shut.

This is how we go about repairing the broken shutter:

1. Drill out the pop rivets and open the exterior plastic flap. This allows you to get access to the roller mechanism/ drum.


2. Wind the drum into the “down” position. If you forget to do this you will not be able to wind the shutter back up once repaired.

3. Remove the webbing straps which connect the blind to the roller drum ( self-tapping metal screw)

4. Carefully raise the shutter in the guides until the broken lamina is free to be disconnected from the second lamina. The plastic laminas slot together and can be easily slid apart.


5. Take the broken lamina to your local hardware shop and buy a replacement cut to the same size. (In this case we didn’t buy a replacement lamina since the remaining laminas were enough to allow the shutter to close properly. When the next lamina down breaks we’ll buy 2 replacements! Sometimes when the roller blind slams shut other brittle laminas also break and need to be replaced. This is easy to do since the laminas simply slide together.)

6. The replacement lamina slides into place.


7. Slide the 2 attachment straps onto the top lamina.

8. Screw the attachment straps to the drum and wind the roller shutter up and down to make sure that everything works correctly.


9. Close the plastic flap and secure it in place either with Pop Rivets (as original) or if you don’t have a rivet gun you may prefer to use self-tapping screws (as we have here).

10. Job done!